In today’s digital age, our smartphones have become an extension of ourselves, storing vast amounts of personal information, including our browsing history. While having quick access to previously visited sites can be convenient, there are times when you might want to clear your search history for privacy reasons or simply to declutter your digital footprint. If you’re using Google Chrome on your Android device, you’re in luck – the process is straightforward and customizable. Let’s dive into the steps to clear your search history and explore some additional tips to manage your browsing data effectively.
Why Clear Your Search History?
Before we jump into the how-to, let’s briefly discuss why you might want to clear your search history:
- Privacy: If you share your device or simply want to keep your browsing private, clearing your history prevents others from seeing the sites you’ve visited.
- Performance: Over time, accumulated data can slow down your browser. Clearing it can help improve Chrome’s performance.
- Relevance: Clearing old history can help ensure that your autofill suggestions and search predictions are more relevant to your current interests and needs.
- Security: If you’ve accessed sensitive information on a public or shared device, clearing your history adds an extra layer of security.
Now that we understand the importance, let’s get into the nitty-gritty of how to clear your search history on Google Chrome for Android.
Step-by-Step Guide to Clearing Your Search History
1. Open Google Chrome
First things first, locate and tap the Google Chrome icon on your Android device to launch the browser. Make sure you’re using the most recent version of Chrome for the best experience and most up-to-date features.
2. Access the Menu
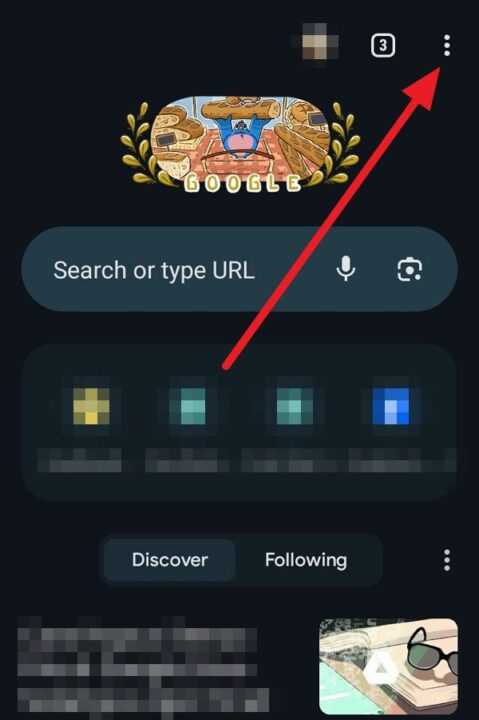
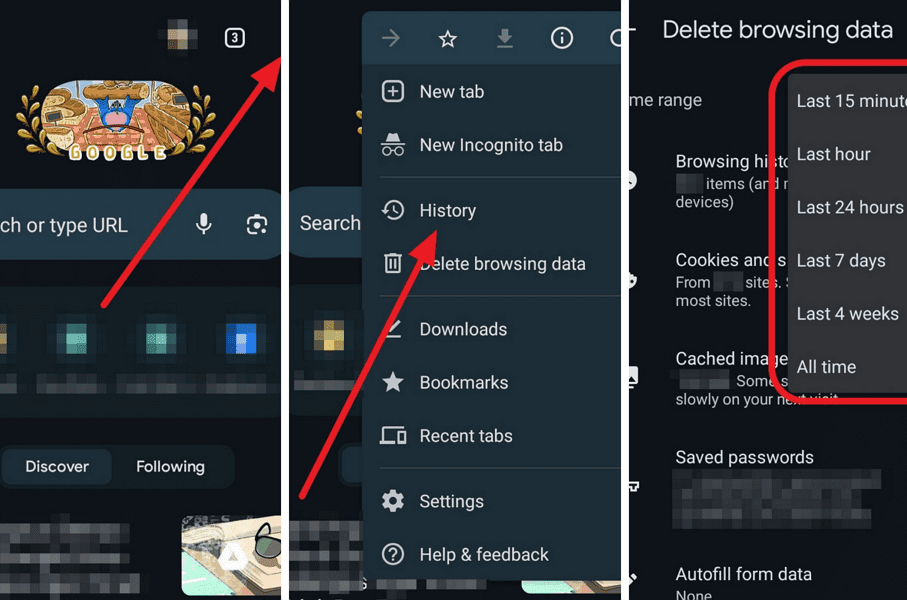
Once Chrome is open, look for the three-dot menu icon in the top-right corner of the screen. This icon is your gateway to Chrome’s settings and features. Tap on it to reveal a dropdown menu with various options.
3. Navigate to History
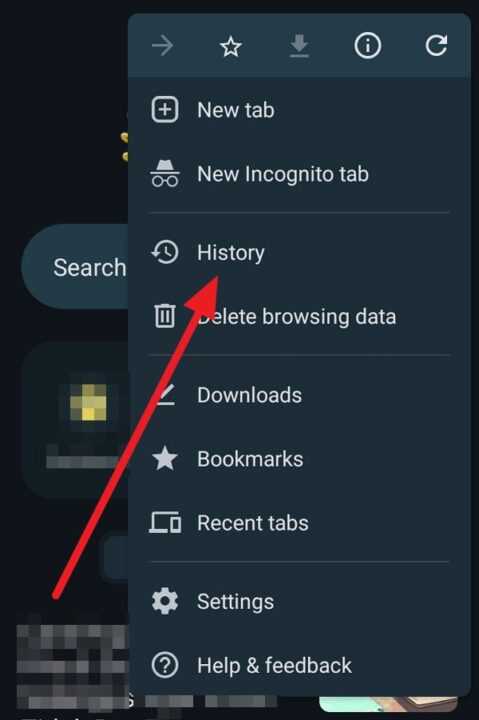
In the dropdown menu, you should see an option labeled “History.” Tap on this to access your browsing history. This is where Chrome keeps a record of all the websites you’ve visited.
4. Clear Browsing Data
Within the History section, you’ll find a button that says “Clear browsing data.” Tap on this to proceed to the data deletion options. This is where you’ll have control over what types of data you want to remove and for what time range.
5. Select Time Range
Chrome allows you to choose how far back you want to clear your history. You’ll see options like:
- Last hour
- Last 24 hours
- Last 7 days
- Last 4 weeks
- All time
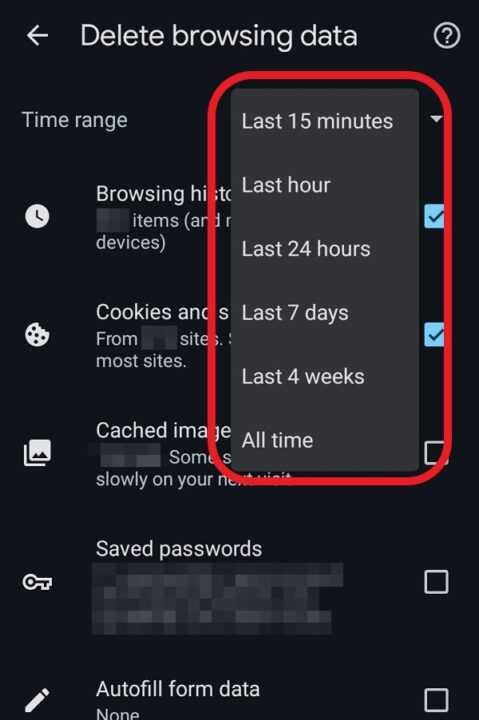
Select the time range that best suits your needs. If you want to start with a clean slate, “All time” is the way to go.
6. Choose Data Types
Under the time range selection, you’ll see a list of data types you can clear. These typically include:
- Browsing history: This is the primary focus if you’re looking to clear your search history.
- Cookies and site data: Clearing this will sign you out of most sites.
- Cached images and files: This can help free up space but might slow down your browsing initially as sites reload resources.
Ensure that “Browsing history” is checked. You can select or deselect other options based on your preferences.
7. Clear Data
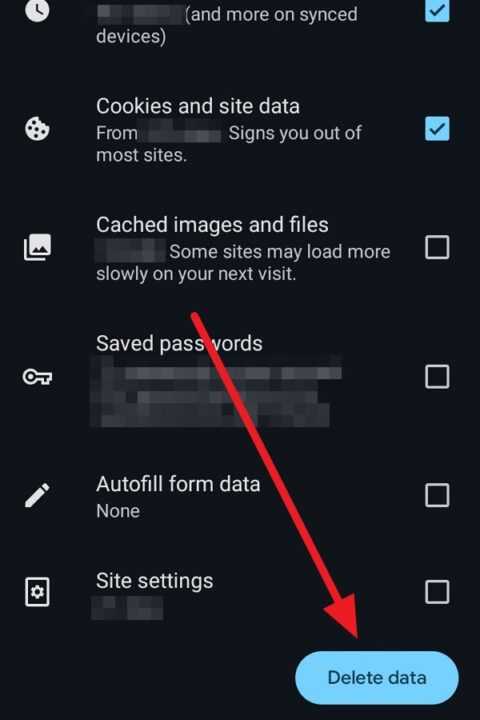
Once you’ve made your selections, tap the “Clear data” button at the bottom of the screen. Chrome will then process your request and delete the selected data for the chosen time range.
8. Confirmation
After the process is complete, you’ll return to the History screen, and your selected data will be cleared. You can verify this by checking that your history is now empty or only shows entries outside of the time range you selected.
Additional Tips for Managing Your Chrome Data
Clearing your search history is just one aspect of managing your browsing data. Here are some additional tips to help you maintain your privacy and keep Chrome running smoothly:
Use Incognito Mode
If you want to browse without leaving a history trail, consider using Chrome’s Incognito mode. To access this:
- Tap the three-dot menu icon.
- Select “New Incognito tab.”
In this mode, Chrome won’t save your browsing history, cookies, site data, or information entered in forms.
Customize Your Sync Settings
If you use Chrome across multiple devices, you can customize what data gets synced:
- Go to Chrome Settings.
- Tap on your Google account at the top.
- Select “Sync” and choose what data you want to sync across devices.
This allows you to keep certain browsing data local to your Android device.
Set Up Automatic Deletion
To save time and ensure regular privacy maintenance:
- Go to your Google Account settings.
- Navigate to “Data & privacy.”
- Under “History settings,” choose “Web & App Activity.”
- Select “Auto-delete” and choose how long you want to keep your data before it’s automatically deleted.
Use Third-Party Privacy Apps
Consider using privacy-focused apps that can help manage your browsing data more comprehensively. These apps often offer features like scheduled cleanups and more granular control over what data is retained or deleted.
Conclusion
Clearing your search history on Google Chrome for Android is a simple yet powerful way to maintain your privacy and keep your browsing experience fresh. By following the steps outlined above, you can easily manage what information Chrome retains about your online activities. Remember, regular maintenance of your browsing data not only protects your privacy but can also help keep Chrome running smoothly on your Android device.
Whether you’re preparing to hand off your device, trying to free up some space, or simply like to keep your digital life tidy, knowing how to clear your search history is an essential skill for any Chrome user. By combining this knowledge with the additional tips provided, you can create a browsing experience that’s tailored to your privacy needs and preferences.
As we continue to live more of our lives online, taking control of our digital footprint becomes increasingly important. So, make it a habit to regularly review and clear your browsing data. Your future self will thank you for the enhanced privacy and improved browser performance.
Leave a Reply