Key takeaways:
- Changing your default search engine in Chrome for Android is quick and easy
- You can choose from popular options like Google, Bing, DuckDuckGo, and Yahoo
- Custom search engines can be added for more specialized searching
- Changing your search engine can enhance privacy and provide different results
- The process takes just a few taps in Chrome’s settings menu
In today’s digital age, our smartphones have become an extension of ourselves, serving as our primary gateway to the vast world of information available on the internet. For many Android users, Google Chrome is the browser of choice, offering a seamless and intuitive browsing experience. While Google is the default search engine for Chrome, you might be surprised to learn that you’re not limited to this option. Whether you’re concerned about privacy, looking for different search results, or simply want to try something new, changing your default search engine in Chrome for Android is a straightforward process that can significantly impact your browsing experience.
In this comprehensive guide, we’ll walk you through the steps to change your search engine on Chrome for Android, explore the reasons why you might want to make this change, and discuss some popular alternatives to Google. So, let’s dive in and discover how you can customize your mobile browsing experience to better suit your needs and preferences.
Why Change Your Default Search Engine?
Before we delve into the how-to, let’s briefly discuss why you might want to change your default search engine in the first place. While Google is undoubtedly the most popular search engine worldwide, there are several compelling reasons to consider alternatives:
Privacy concerns: Some users are uncomfortable with the amount of data Google collects. Alternative search engines like DuckDuckGo offer enhanced privacy features.
Different results: Each search engine has its own algorithms and indexing methods, which can lead to varied search results. You might find that another search engine provides more relevant results for your specific needs.
Specialized searching: Some search engines focus on particular types of content, such as academic papers or images, which might be more suitable for certain users.
Personal preference: You might simply prefer the interface or features of another search engine.
Avoiding filter bubbles: Using different search engines can help you break out of the “filter bubble” effect, where algorithms show you results based on your past behavior and preferences.
Now that we’ve explored some reasons for changing your search engine, let’s move on to the step-by-step process of making this change in Chrome for Android.
Steps to Change Your Search Engine on Chrome for Android
Changing your default search engine in Chrome for Android is a quick and easy process that can be completed in just a few taps. Here’s how to do it:
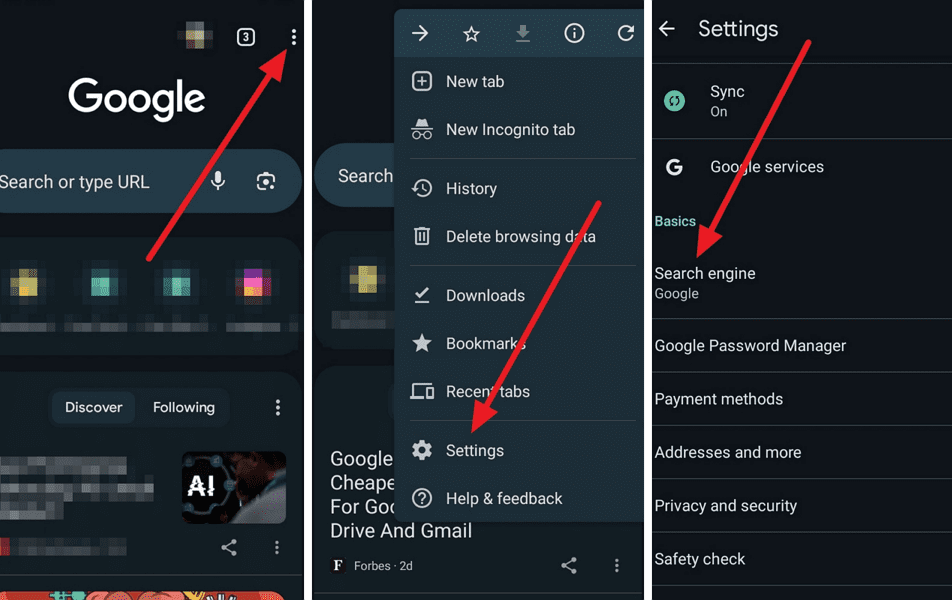
1. Open Chrome: Start by launching the Chrome browser on your Android device. You’ll see the familiar Chrome interface with the address bar at the top.
2. Access the menu: Look for the three vertical dots in the top-right corner of the screen. This is the menu icon. Tap on it to open the Chrome menu.

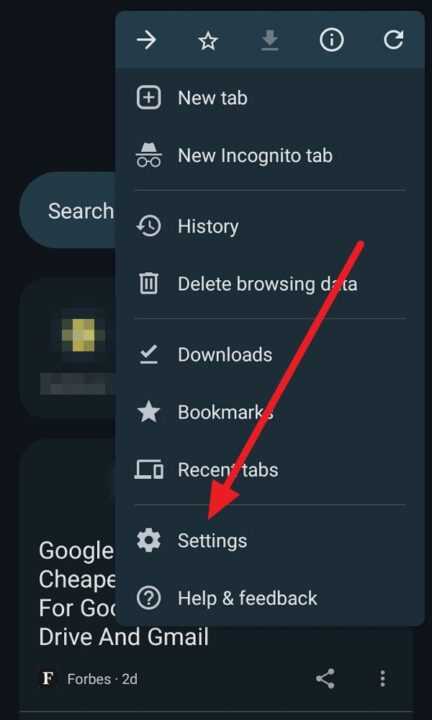
3. Navigate to Settings: In the menu that appears, scroll down until you see the “Settings” option. Tap on it to access Chrome’s settings.

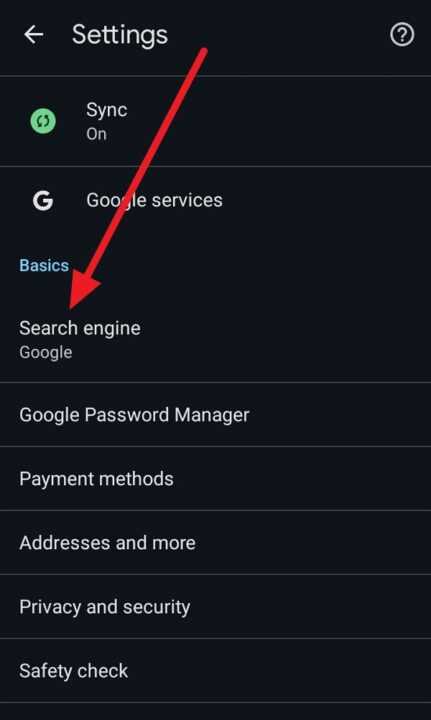
4. Find the Search engine section: Once you’re in the Settings menu, scroll down until you see the “Search engine” option. It should be under the “Basics” section.

5. Select your preferred search engine: Tap on “Search engine,” and you’ll see a list of available options. By default, you’ll likely see Google, Bing, Yahoo, and DuckDuckGo. Simply tap on the search engine you want to use as your default.
6. Confirm your choice: Once you’ve tapped on your preferred search engine, Chrome will automatically set it as the default. You don’t need to save or confirm your choice – it’s that simple!
7. Test your new search engine: To make sure the change has taken effect, go back to the Chrome home page and try a search using the address bar. You should now see results from your newly selected search engine.
It’s worth noting that the list of available search engines may vary depending on your location and the version of Chrome you’re using. If you don’t see the search engine you want to use, don’t worry – we’ll cover how to add a custom search engine later in this article.
Popular Alternative Search Engines
Now that you know how to change your default search engine, let’s explore some popular alternatives to Google that you might want to consider:
Bing: Microsoft’s search engine offers a clean interface and strong image and video search capabilities. It also integrates well with other Microsoft services.
DuckDuckGo: Known for its privacy-focused approach, DuckDuckGo doesn’t track your searches or create user profiles. It’s an excellent choice for those concerned about data privacy.
Yahoo: While not as popular as it once was, Yahoo still offers a comprehensive search experience with news, finance, and other integrated services.
Ecosia: This unique search engine uses its profits to plant trees around the world. It’s a great option for environmentally conscious users.
Startpage: Offering Google search results without the tracking, Startpage is another privacy-focused option worth considering.
Each of these search engines has its own strengths and features, so it’s worth experimenting to find the one that best suits your needs.
Adding a Custom Search Engine
If you don’t see your preferred search engine in the list of options, Chrome for Android allows you to add custom search engines. Here’s how:
- Follow steps 1-4 from the earlier instructions to reach the “Search engine” settings.
- Tap on “Manage search engines.”
- Scroll to the bottom and tap on “Add search engine.”
- Enter a name for the search engine, a keyword (which can be used for quick searches), and the search URL.
- Tap “Save” to add your custom search engine.
- To set it as your default, tap on the three dots next to the newly added search engine and select “Make default.”
This feature is particularly useful if you frequently use specialized search engines for work or hobbies.
Tips for Optimizing Your Search Experience
Changing your default search engine is just one way to enhance your browsing experience. Here are a few additional tips to help you get the most out of your searches:
- Use search operators: Most search engines support advanced operators like quotation marks for exact phrases or minus signs to exclude terms. Learning these can significantly improve your search efficiency.
- Try voice search: Chrome for Android supports voice search, which can be faster and more convenient in certain situations.
- Utilize incognito mode: If you want to perform searches without affecting your search history or personalized results, use Chrome’s incognito mode.
- Keep your browser updated: Regular updates to Chrome often include improvements to search functionality and security.
- Explore search engine features: Many search engines offer specialized tools like currency converters, weather forecasts, and more directly in the search results. Familiarize yourself with these features to save time.
Conclusion
Changing your default search engine in Chrome for Android is a simple process that can significantly impact your browsing experience. Whether you’re looking for enhanced privacy, different search results, or just want to try something new, the ability to customize your search engine puts you in control of your online experience. By following the steps outlined in this guide, you can easily switch between different search engines or even add custom options to suit your specific needs. Remember, the best search engine is the one that works best for you, so don’t be afraid to experiment with different options until you find your perfect match. Happy searching!

Leave a Reply