Google Maps is an indispensable tool for navigation and exploring new places. However, as we use it, our search history accumulates, potentially cluttering the app and raising privacy concerns. Whether you’re looking to streamline your Google Maps experience or protect your privacy, knowing how to delete your recent searches is essential. This comprehensive guide will walk you through the process of clearing your Google Maps search history on Android devices, ensuring you have full control over your data.
Why Delete Your Google Maps Search History?
Before diving into the steps, it’s important to understand why you might want to delete your Google Maps search history. There are several compelling reasons:
Privacy Protection: Your search history can reveal a lot about your movements and interests. Clearing it regularly helps maintain your privacy, especially if you share your device or are concerned about data breaches.
Improved Recommendations: Google Maps uses your search history to provide personalized recommendations. By clearing old searches, you can ensure that the app’s suggestions are based on your current interests and needs.
Decluttering: Over time, your search history can become cluttered with outdated or one-time searches. Clearing it helps keep your Google Maps experience clean and organized.
Performance: While not always noticeable, a large search history can potentially impact the app’s performance. Regularly clearing it can help maintain optimal functionality.
Now that we understand the importance of managing our Google Maps search history, let’s go through the steps to delete it on your Android device.
Step-by-Step Guide to Delete Recent Searches on Google Maps for Android
Step 1: Open Google Maps
Begin by locating and tapping the Google Maps icon on your Android device. Ensure you’re signed in to your Google account, as your search history is tied to your account rather than the device itself.
Step 2: Access Your Profile
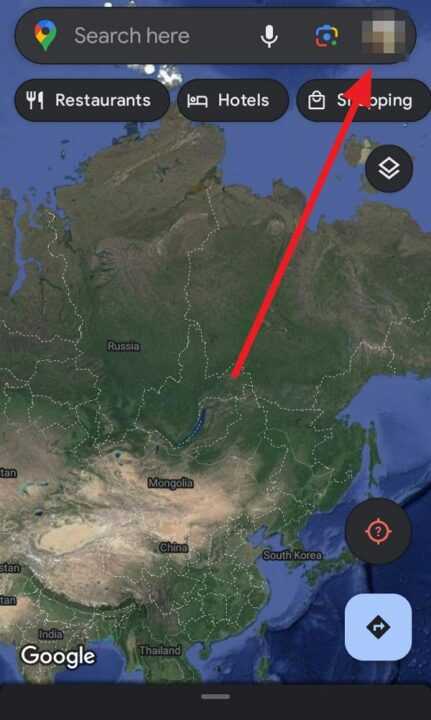
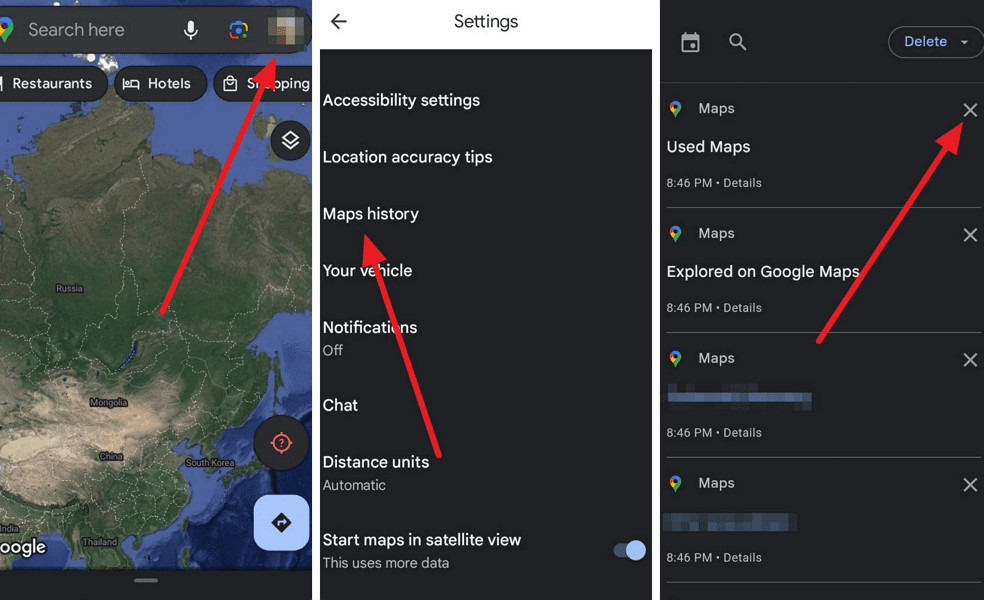
Once the app is open, look for your profile picture or initial in the top-right corner of the screen. Tap on this icon to open the menu.
Step 3: Navigate to Settings
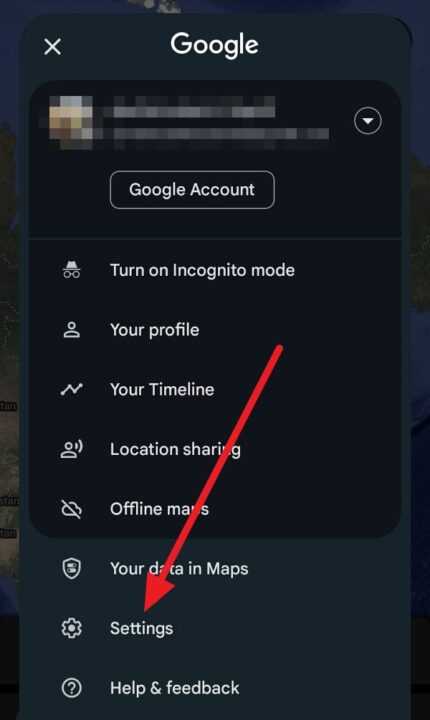
In the menu that appears, scroll down until you find the “Settings” option. Tap on it to access your Google Maps settings.
Step 4: Find Maps History
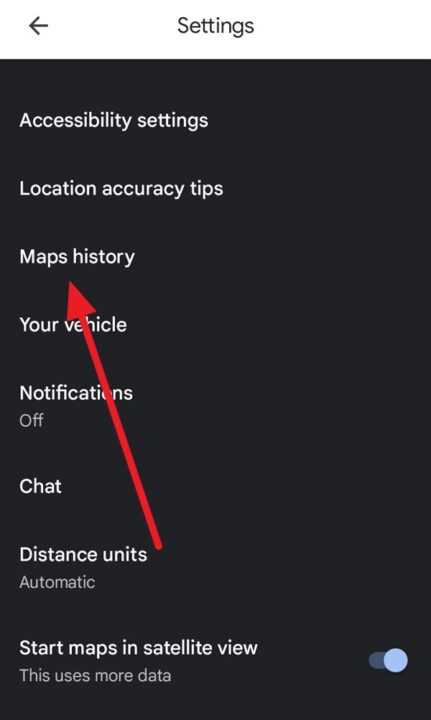
Within the Settings menu, scroll down to the “Personal content” section. Here, you should see an option labeled “Maps history” or “Search history.” Tap on this to proceed.
Step 5: View Your Search History
You’ll now be taken to a page that displays your Google Maps activity, including your recent searches. This page is actually part of your Google Account’s activity controls, specifically filtered for Maps-related actions.
Step 6: Delete Individual Searches
If you want to remove specific searches:
- Scroll through your history
- Find the search you want to delete
- Tap the “X” icon next to it
- Confirm the deletion when prompted
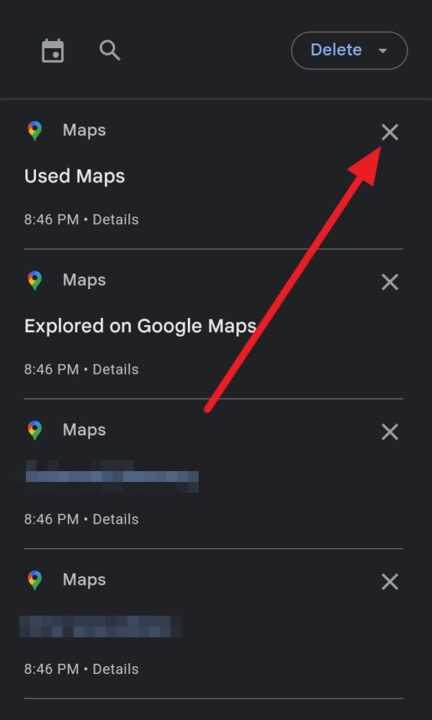
This method is useful if you only need to remove a few specific items from your search history.
Step 7: Delete Bulk Searches
For a more comprehensive cleanup:
- Look for the “Delete” option, usually represented by a trash can icon or the word “Delete” at the top of the screen
- Tap on this to open the deletion options
- Choose from options like “Delete today’s activity,” “Delete custom range,” or “Delete all time”
- Select the option that best fits your needs
- Confirm your choice when prompted
Pro Tip: If you choose “Delete custom range,” you can specify a particular time period for which you want to delete your search history. This is helpful if you want to clear searches from a specific trip or time frame.
Step 8: Set Up Auto-Delete (Optional)
To maintain your privacy automatically:
- Look for the “Auto-delete” option in the same menu where you found the delete options
- Tap on it to set up automatic deletion of your Maps activity
- Choose how long you want Google to keep your activity before deleting it (options typically include 3 months, 18 months, or 36 months)
- Confirm your selection
Setting up auto-delete ensures that your older search history is regularly cleared without you having to remember to do it manually.
Step 9: Verify Deletion
After deleting your search history, it’s a good idea to double-check that the deletion was successful:
- Exit the Maps history page
- Return to the main Google Maps screen
- Tap on the search bar to see if your recent searches have been cleared
If you still see some searches, you may need to force close the app and reopen it for the changes to take effect.
Additional Tips for Managing Your Google Maps Privacy
While deleting your search history is an important step in maintaining your privacy on Google Maps, there are other measures you can take to enhance your privacy:
Use Incognito Mode: When searching for sensitive locations or during private trips, consider using Google Maps in Incognito mode. This prevents your searches and navigation from being saved to your account.
Review Location History Settings: In addition to search history, Google Maps can track your location history. Review and adjust these settings in your Google Account to control what location data is saved.
Manage App Permissions: Regularly review the permissions granted to Google Maps on your Android device. Ensure it only has access to necessary information and features.
Clear Cache Periodically: Clearing the app’s cache can help remove temporary data and potentially improve performance. You can do this through your device’s Settings > Apps > Google Maps > Storage.
Conclusion
Managing your Google Maps search history on Android is a straightforward process that can significantly enhance your privacy and improve your app experience. By following these steps and implementing additional privacy measures, you can enjoy the benefits of Google Maps while maintaining control over your personal data.
Remember, privacy management is an ongoing process. Make it a habit to regularly review and clear your search history, and stay informed about Google’s privacy policies and features. With these practices in place, you can navigate confidently, knowing that your digital footprints are under your control.
Whether you’re clearing your history for privacy reasons, to declutter your app, or to improve your recommendations, taking charge of your Google Maps data is a smart move in our increasingly digital world. Stay informed, stay secure, and enjoy your journeys with peace of mind.
Leave a Reply